FAST and EASY Powerful Methods To Cut Out Trees In Photoshop
FAST and EASY Powerful Methods To Cut Out Trees In Photoshop
In this video, I’m going to show you FAST and EASY Powerful Methods To Cut Out Trees In Photoshop
The techniques that you’re going to learn in this tutorial could be used on anything, not just trees. These are very powerful techniques that you should know. Okay. Let’s get started.
We’re going to dive right in, and I’m going to show you a method that you probably don’t know, but it’s a FAST and EASY powerful method, and I really think that you should know it.
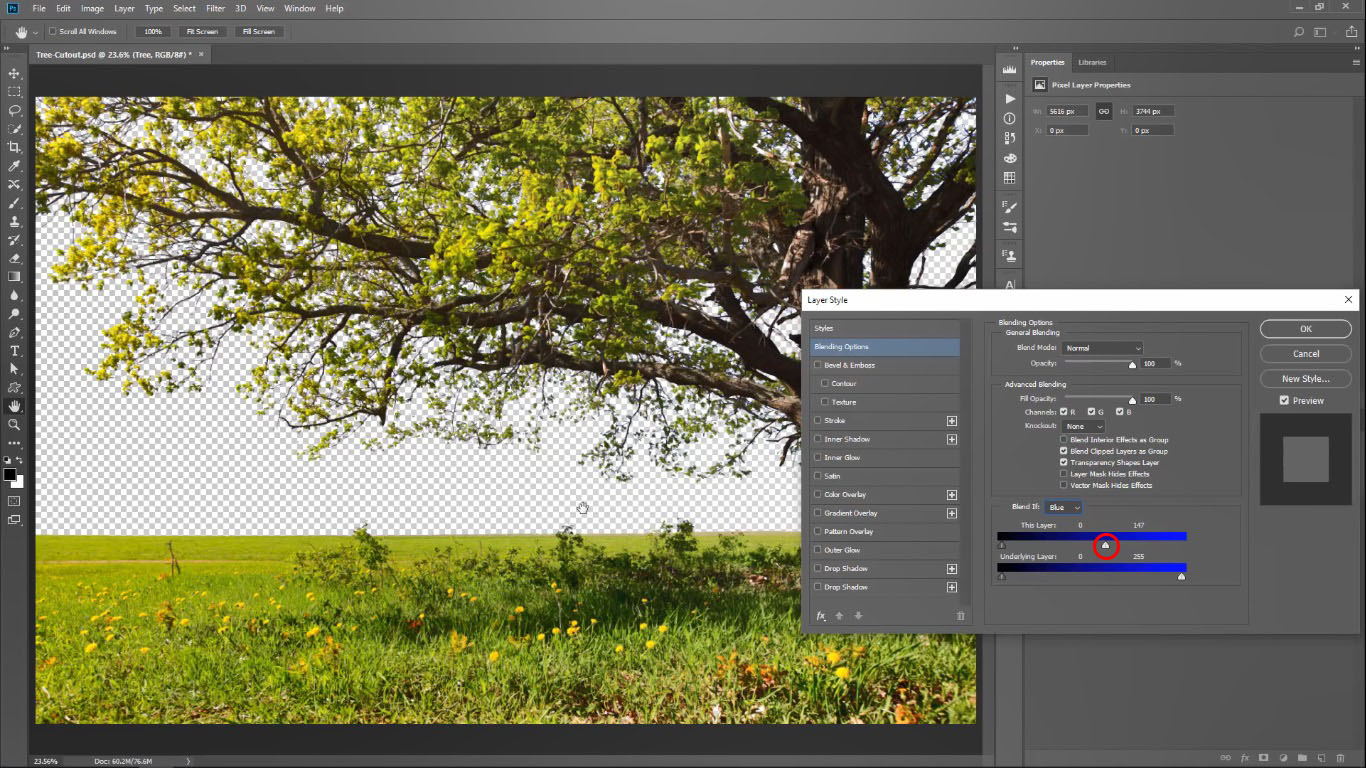
Anyway, if you want to mask out or cut out this tree, one of the easiest ways of doing it is with the Blend If options. If I double-click to the side of the layer I bring up the Layer Style window. In this window, It is called Blend If. But we can use the luminosity of the layer to show or hide pixels, or we can select different channels to show or hide pixels. So, in the Blend If option I have the Gray – Red – Green and Blue. These are channels, of course, and gray is just luminosity. So, if I look at my image

and think of what I want to hide, in this case the sky because I want to cut out the tree. So, I want to hide the sky. Then out of all these options, Blue is the better one because the sky is Blue. So, the Blue channel contains a lot of information relevant to the pixels that we’re trying to select. And you’ll be able to better see the channel in the second example when we actually work with the channels.
You Can Also Visit Most Useful Photoshop CC Tips and Tricks to Work Faster in 2020


So, we can use this channel to hide or show pixels. So, if I select Blue, then I can use the “This layer” control or the “Underline layer” control to show or hide pixels. In this case, we only have one layer, so we’re going to work with the “This layer” control. I want to hide the blue pixels, so that I can select everything that is not blue. So, I can click on this point, which controls the blues, and drag it to the left. And notice that when I do, I immediately hide the sky because the sky is blue. I hold Alt (option on the Mac), and click on this point to split it in half, and I can create a smoother transition.

Basically what this is doing is that anything that is this level of blue or brighter will be hidden. Everything in this area will be a smooth transition, and everything from this point to the left will be 100% visible. So, once I press OK, notice now that I no longer have a sky. If I create a new Solid Color Adjustment Layer. And I’ll just make it gray, press Ok, and drag it to the bottom of the layer stack. You can see now that the sky was removed.

Now, this is not really transparency and it’s not really a cutout yet, because if you look at the layer thumbnail, you can actually still see the sky.

We’re hiding those pixels based on the luminesce value of the channel. So, if we create an Adjustment Layer such as the “exposure” go to Adjustment Layer click on this icon to clip it to the layer below so that it only will fix the tree layer, what happens when I change the exposure. The sky comes back. See that? Or I can hide more of the layer because when I change the luminosity of the layer, it also changes the luminosity of the channel, the blue channel, which is what Blend If is using to create transparent pixels.
So, if we change the luminosity, we change which pixels are transparent and which are not. Another way of knowing that this is not really transparency is if I press Ctrl (Command on the Mac), and click on the layer thumbnail, I make a selection around the entire layer, and not really the transparent pixels.

Even with this layer disabled, if I control-click, nothing happens, I still select the entire layer. So, I’m going to deselect the layer by pressing Ctrl+D (Command D on the Mac), and then just delete this layer.
So, this is a trick that a lot of people don’t know, including many professionals. And I can guarantee you that you probably haven’t seen it in too many tutorials. And that is if you right-click on the layer, you can select Convert to Smart Object, and notice what happens to the layer thumbnail.
You can actually see transparency now. So, if I press Ctrl (Command on the Mac), and click, now I can actually make a selection out of those transparent pixels. And if I create an exposure Go to the Adjustment Layer click into exposure, clip it to the layer below, and adjust the exposure, notice that now the sky doesn’t come back. So, that’s the trick. Making a Smart Object with Blend If. And if you need to edit the transparency, just open up the Smart Object and edit the Blend If.

Thank you so much for watching, and I will talk to you again very soon. EASY Powerful Methods To Cut Out Trees In Photoshop Second Method
